Ceramic restorations are among the most readily used treatments for improving the esthetics of anterior and posterior teeth. These restorations have evolved over the years in terms of material selection and fabrication techniques. Even with these continued improvements, one of the greatest determinants of success in a restorative case is the final color. Understanding what influences the final color can have a significant impact on case success and overall patient satisfaction. Therefore, it is critical to understand what these influencers are and take steps to improve the overall end-result.
Evaluating Current Condition
It is critical to communicate the current oral condition. Begin by determining the color of the existing tooth.
Note: it is always a good idea to evaluate and select a color using daylight conditions or color-corrected lights.
Evaluate if there are any discolorations and if yes, what type of discoloration? Identifying this step will help in determining what material should be used. It will also help in preparation design. For example, if the plan is to restore the six anterior teeth and it is determined that 6-10 have a favorable color, but number 11 is discolored, then number 11 will need a more aggressive crown prep to help provide the room necessary to mask the discoloration and match the other restorations.
Preparation
The overall preparation needs to be reduced correctly on the labial. The labial must be prepped to keep the reduction of each tooth in the same labial position. Even with veneer cases identified as no-prep, it is advisable to reduce any area on the labial necessary to create an even alignment.
Color Communication
Accurately describing the underlying tooth color or prep shade is crucial information. It should be done with photographs of the guide next to the prepped tooth/teeth. When describing the prepped tooth shade, it is essential to provide the shade and translucency or opacity of the preps. This information combined with the desired shade of the new restorations will help determine critical factors in the fabrication process, such as how much die spacer will need to be used. The amount of die spacer plays an integral part in controlling the thickness of the cement that will be used in the final case insertion. Especially when masking out undesirable tooth colors, two to three coats of die spacer may be needed.
Choose the final shade. When prescribing e.max restorations, the best shade guide to use for choosing a color is the Vita shade guide. The ingots that are used in the fabrication are aligned with this guide, and its usage will significantly reduce variations in the results.
In addition to communicating the prep shade and desired shade, also be sure to take photos that reveal any specific characterization for matching purposes.
Material selection
Using either a pressed system as with e.max or a layered system such as zirconia restorations can also influence the results. For most cases, it is possible to achieve excellent results with a pressed restoration, but when masking severe discoloration, a zirconia restoration is an ideal material choice. In either of these options, choosing the correct porcelain or ingot color and addressing the degree of translucency is critical when trying to achieve excellent results.
Chair-side Controls
The fabrication of a dental restoration is an art form. Both Laboratories and Dentists are tasked to mimic nature. In dentistry, color is a critical factor in creating restorations that look and function like teeth. For the dentist, one key area in achieving exceptional results lies in the cementation of the final restorations. The laboratory should take in all the information provided in the steps already outlined in this article. If the results are satisfactory, then it is possible to bond restorations in with clear cement. However, as with most customized processes, many things can affect the final restoration, and it may need a slight modification to make it perfect. These modifications can be met with cementation kits that have a wide variety of colors and translucencies both in terms of the composite luting cement and try-in gels. With these materials, the following steps should be followed at insertion:
- Try-in restorations to determine the fit, shape, and length are acceptable.
- Evaluate the color to determine the acceptability. To do this, it is crucial to begin with a clear, try-in gel. Place the gel in the restoration and place it on prep to reveal the initial color and translucency level.
- If the initial evaluation reveals a perfect match, then the veneer can be bonded using clear cement.
- If the veneer needs color adjustments, then the other multi-color and translucency try-in gels can be utilized until the desired outcome is achieved.
Case Example
This patient presented needing porcelain crowns on 8 and 9.
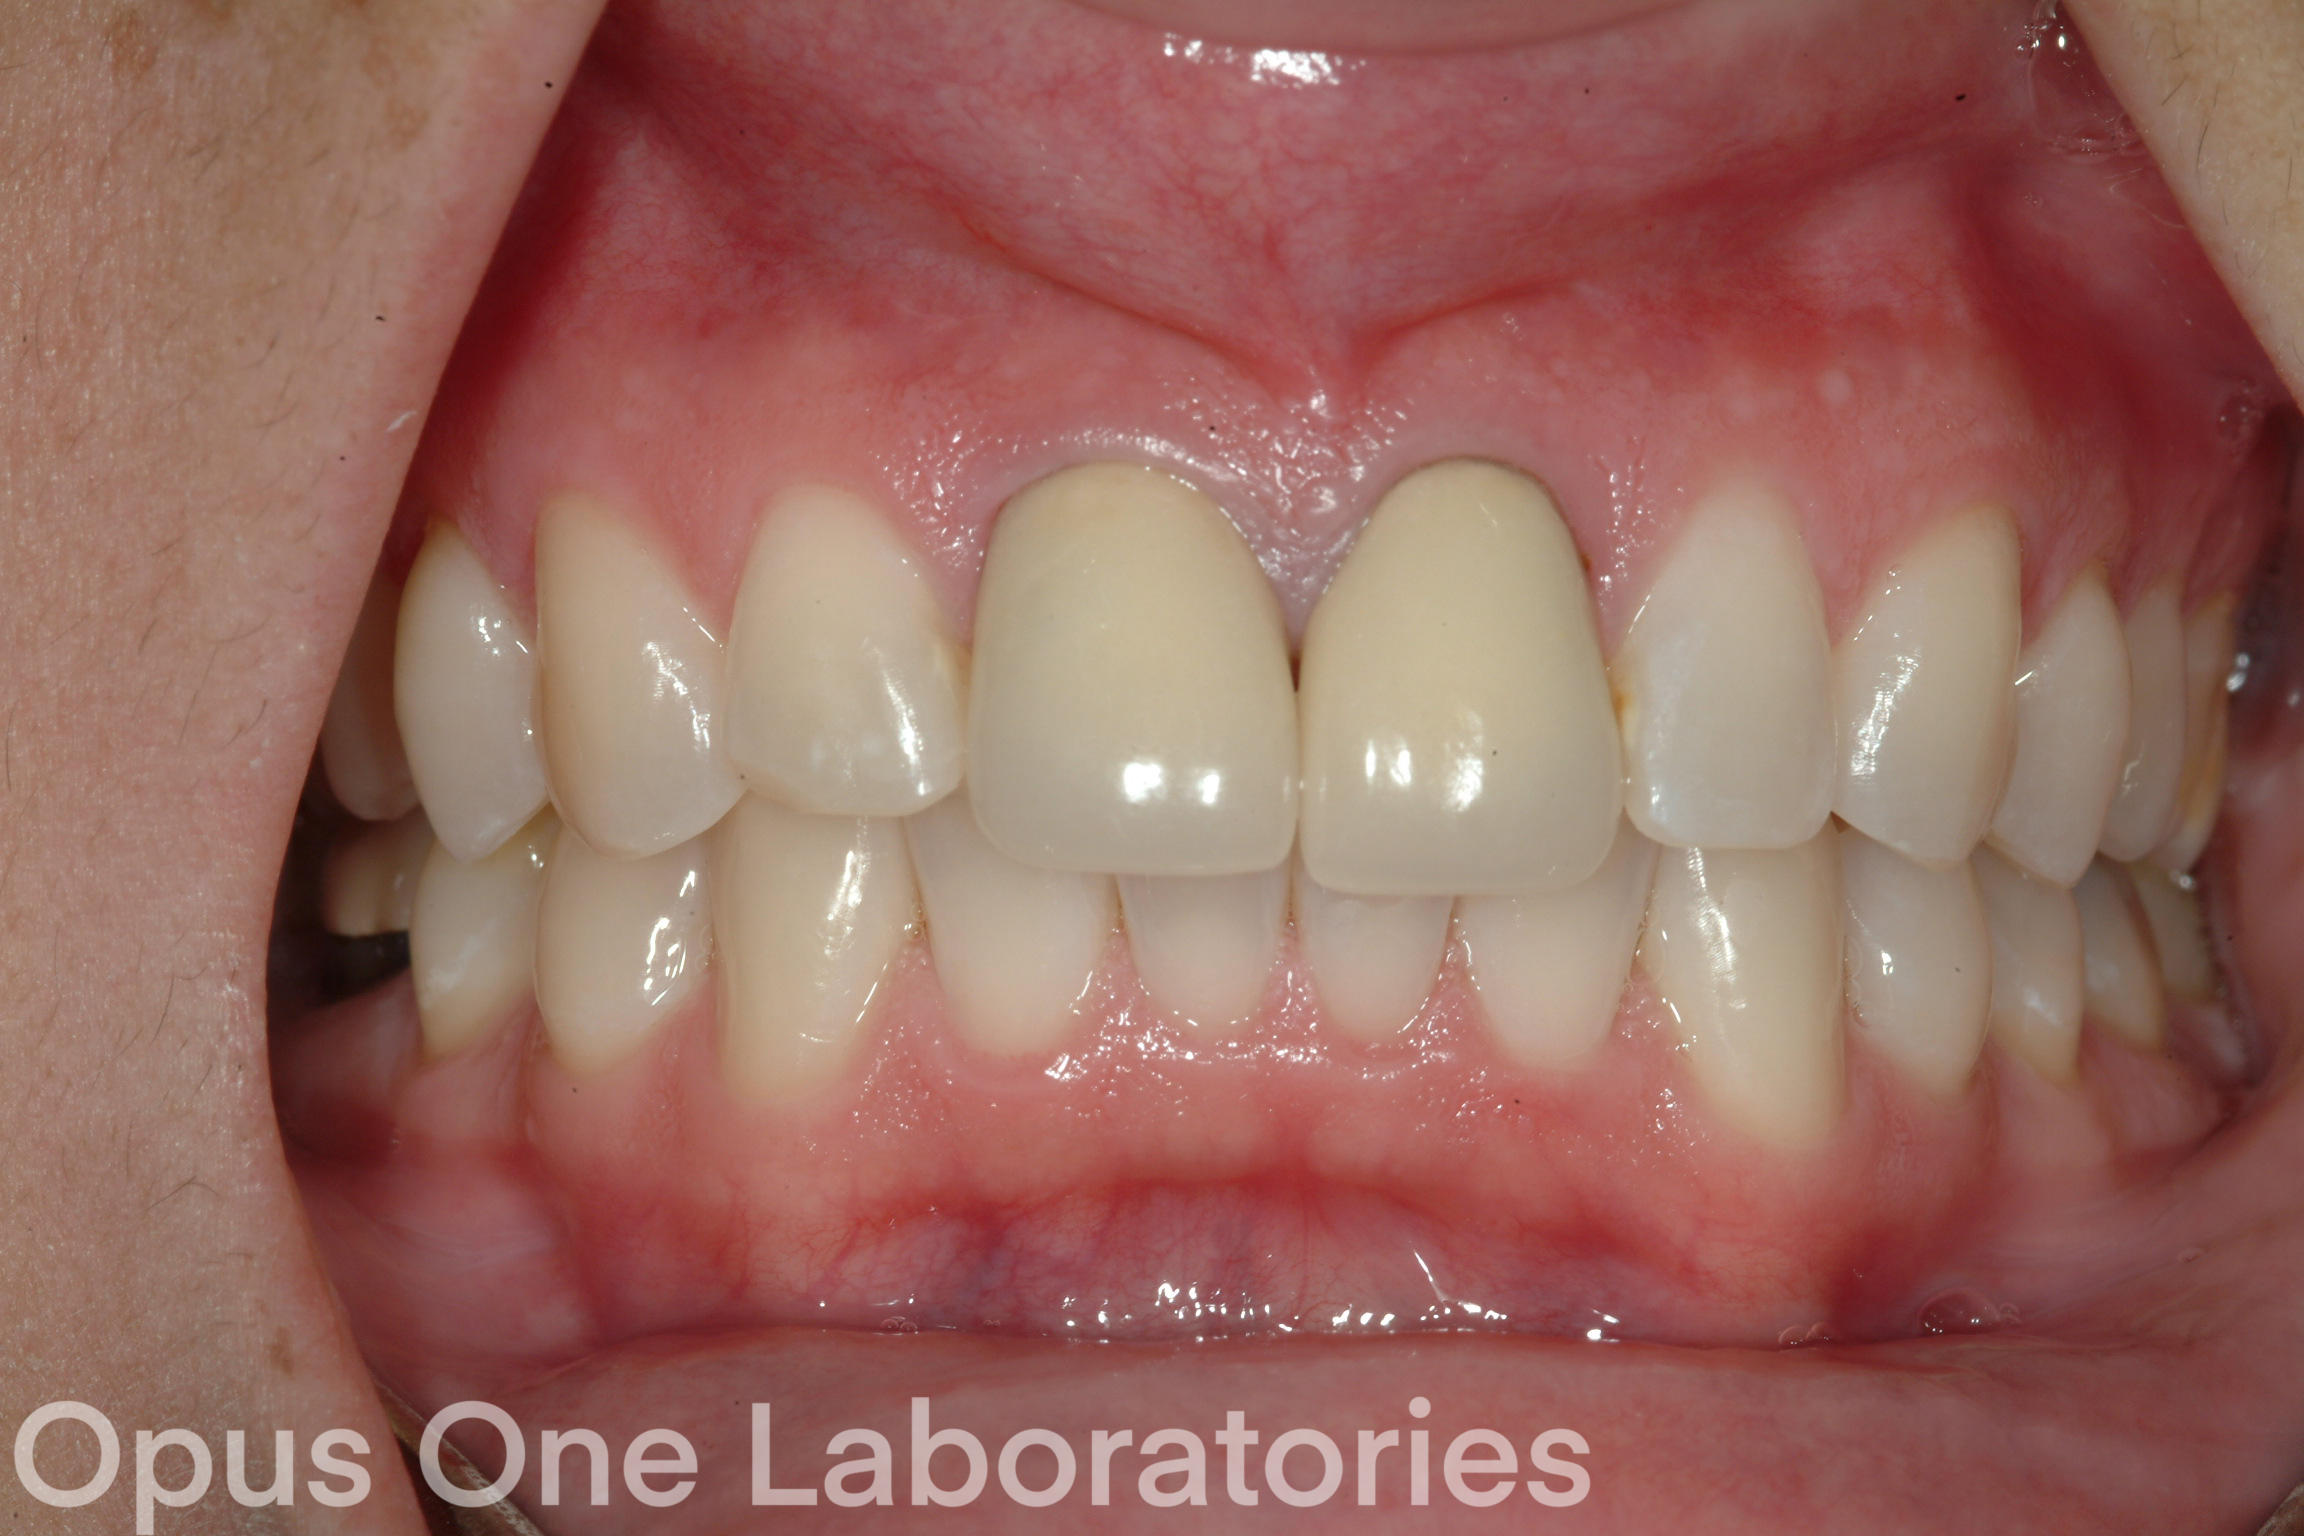
Through the evaluation of the existing situation, the patient desired improved esthetics on 8 and 9. The previous crowns did not match the patient’s natural dentition. There was discoloration around the margin. The crowns were not the same length and were too bulbous on the labial. It was determined this case could be restored with e.max crowns.
The doctor provided the necessary shade information, and it was determined that the underlying tooth color on number 8 was not desirable. This information was used to fabricate two e.max crowns.
Try-In
Initially, these crowns were tried-in dry where the following was evaluated:
- Shape
- Length
- Positioning
- Occlusion
- Proximal contacts
- Embrasures
- Incisal edge length
- Surface texture
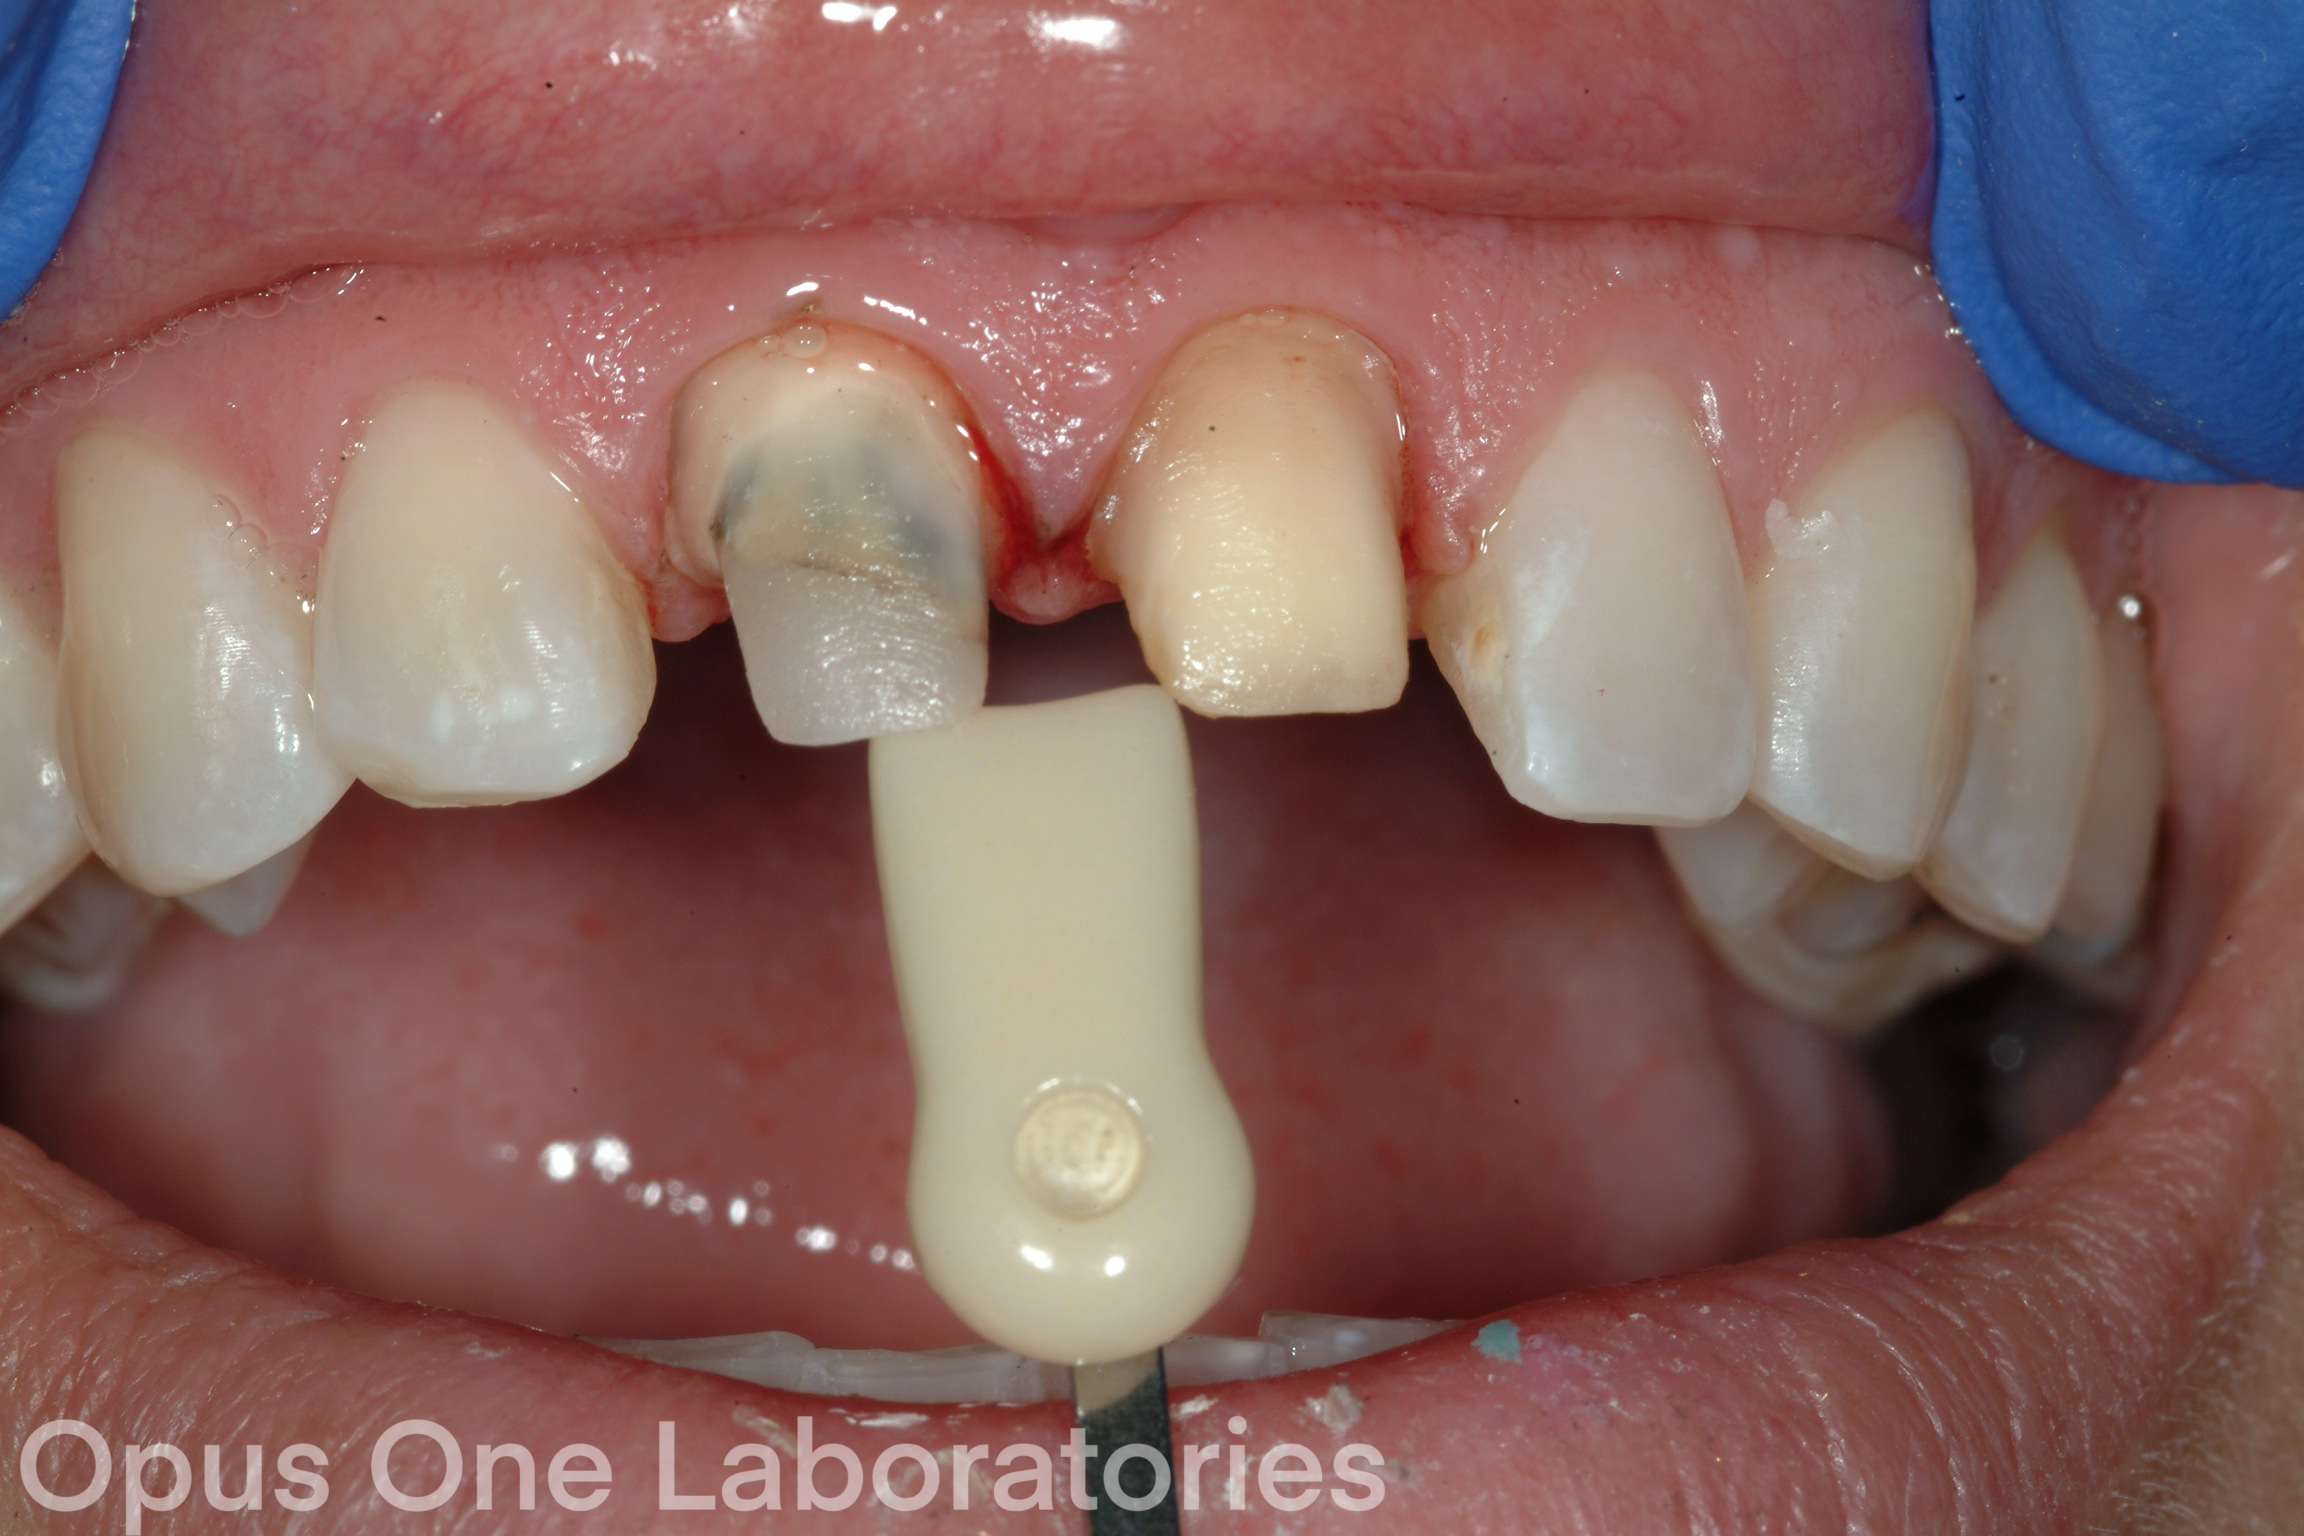
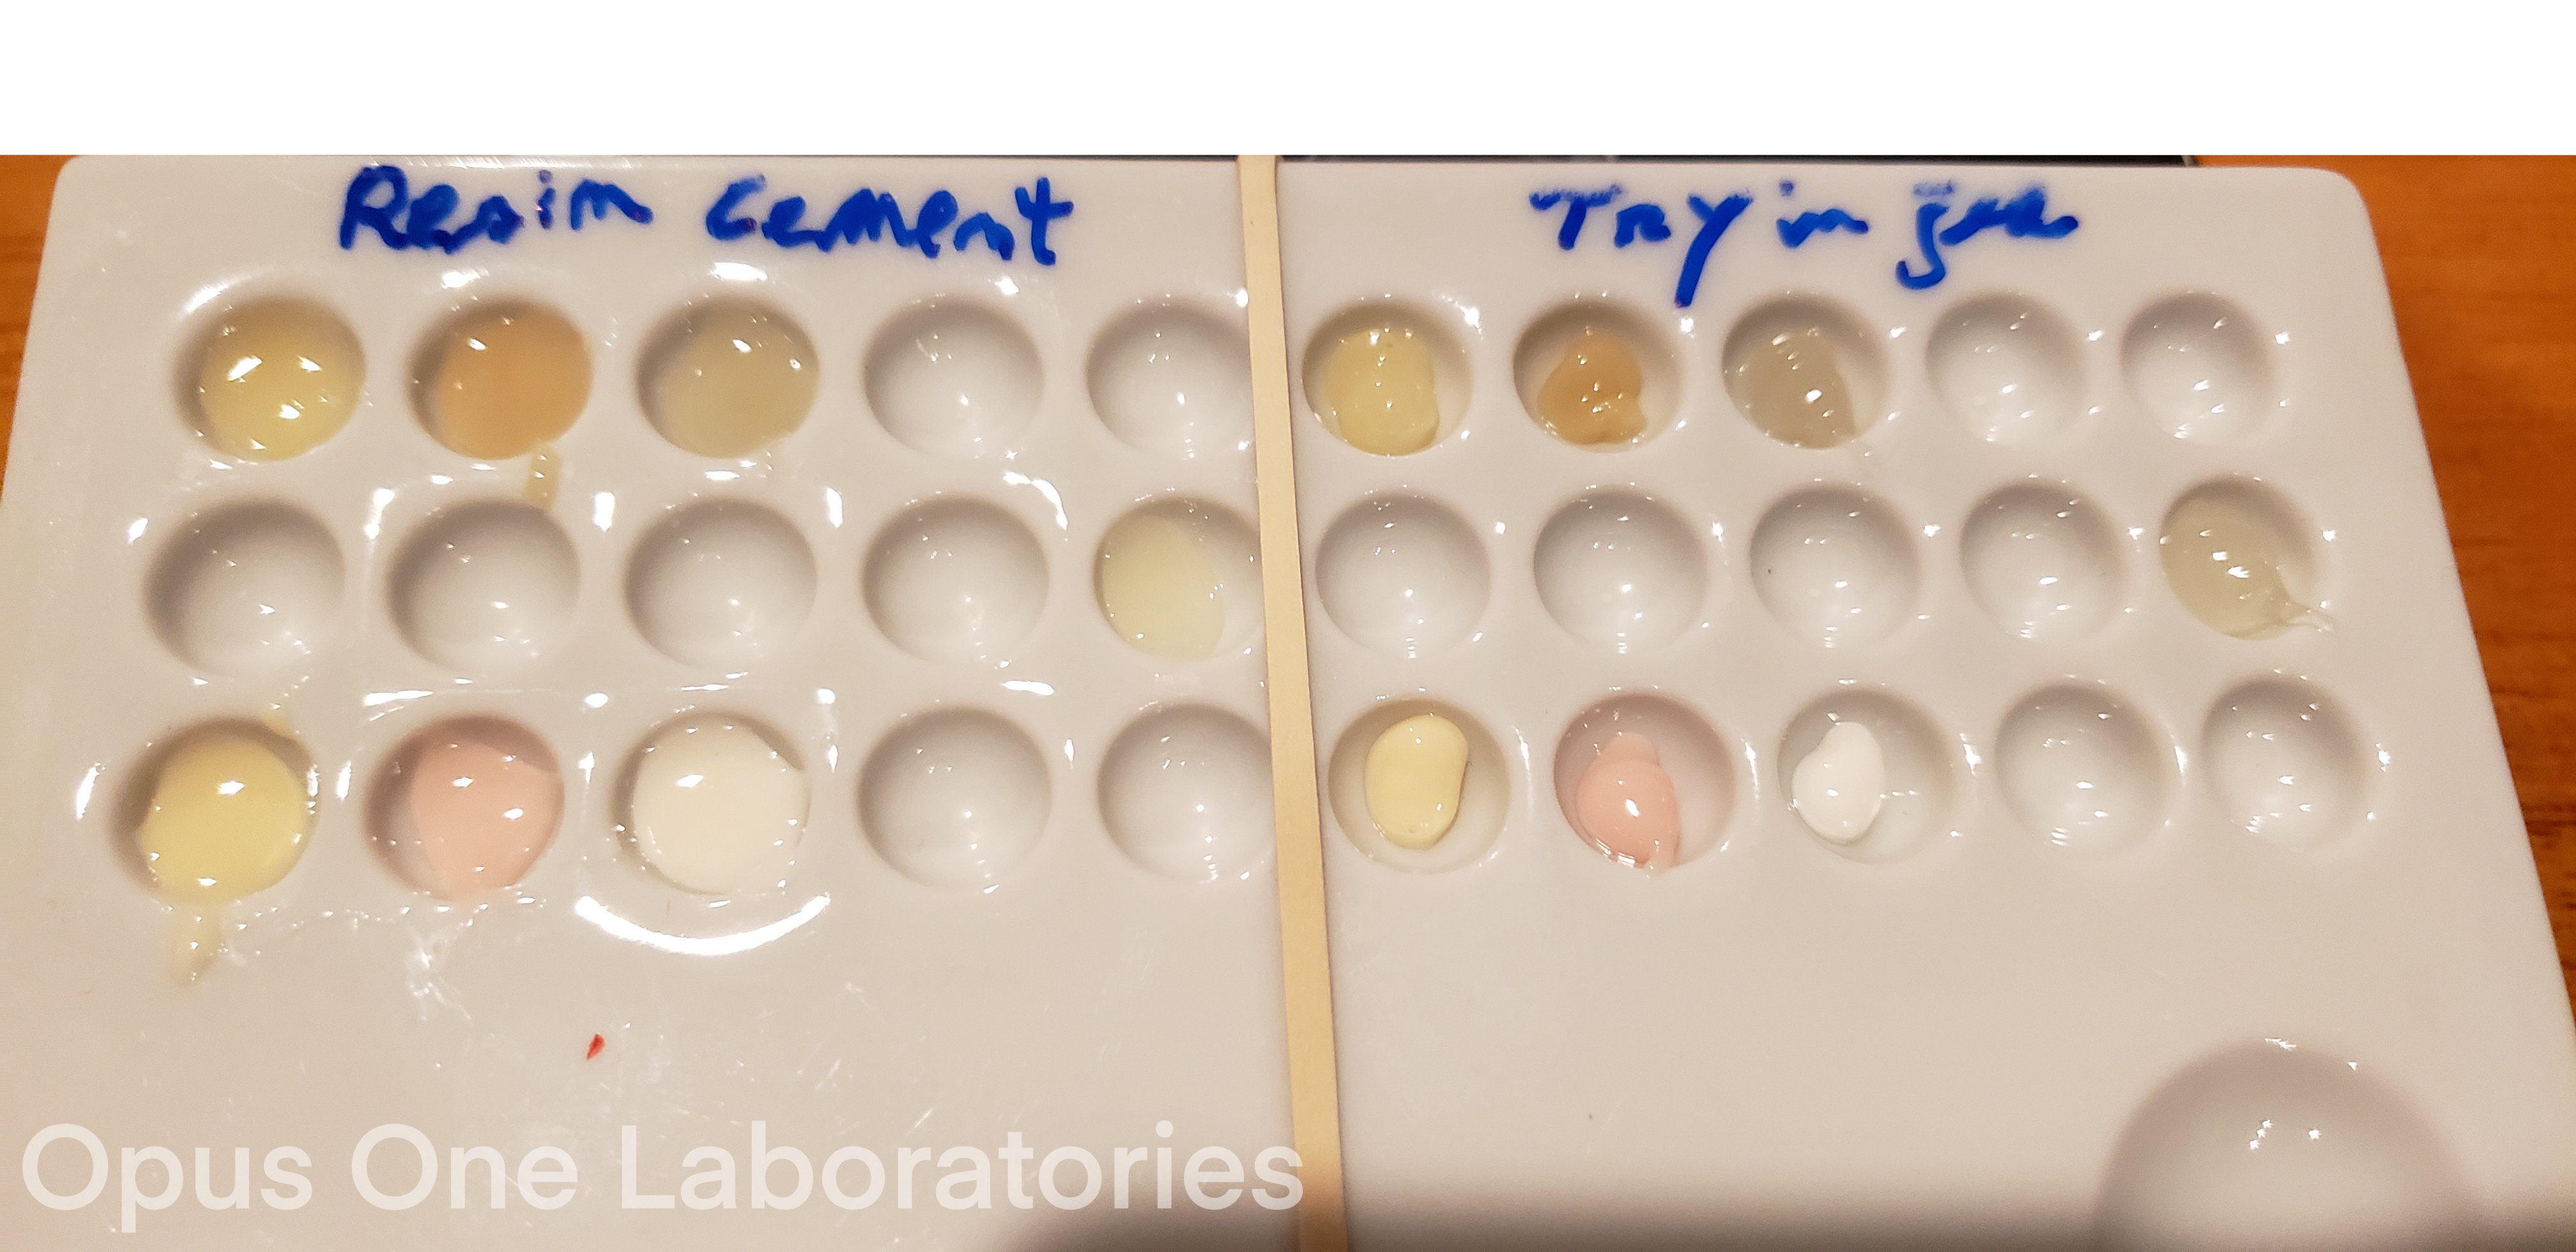
After these details are evaluated and accepted, the final shade color is analyzed. This should be done using a try-in gel that mimics the properties of the final luting cement. While many companies make try-in gel systems, the one I have found over the years to be a great option is Insure by Cosmedent. It is an easy-to-use resin cement system that comes in two viscosities. It has a wide range of colors, and the try-in gels allow the clinician to make modifications to the results chairside.
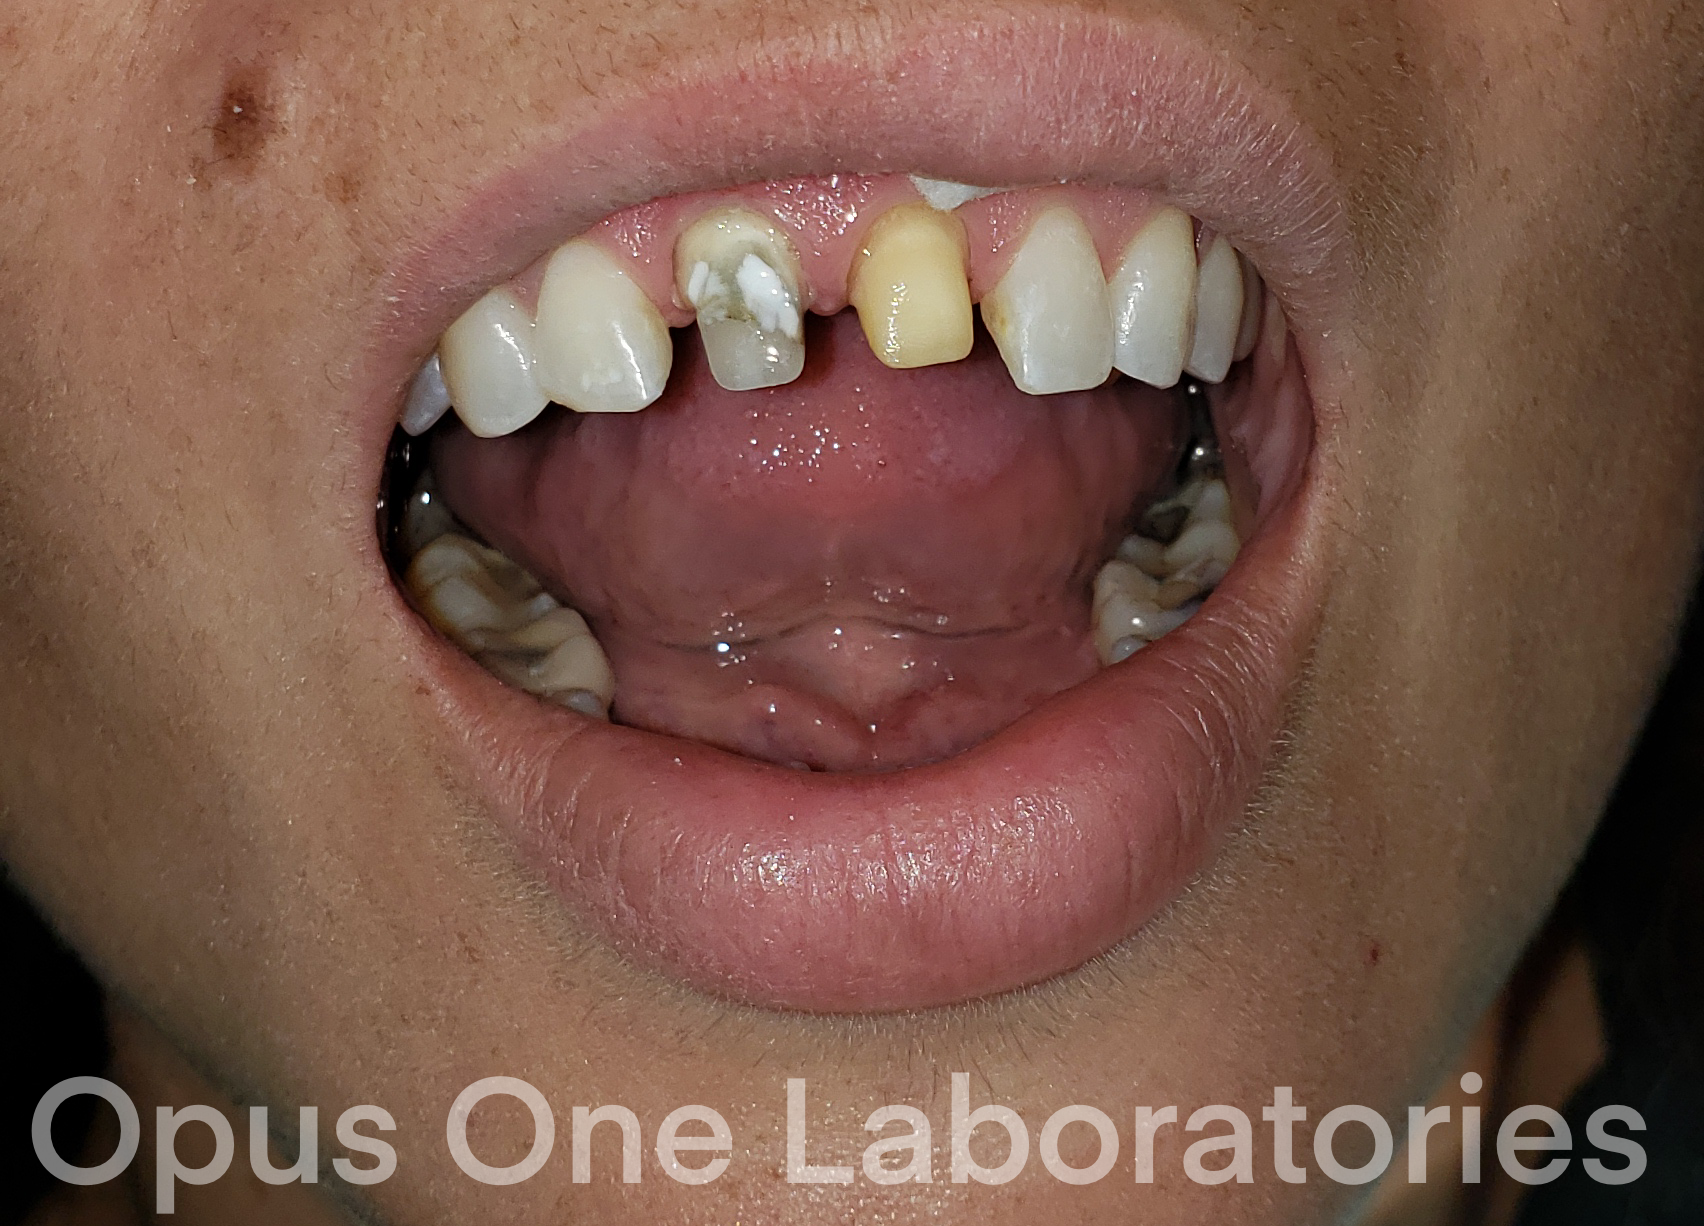
The discoloration on tooth number 8 was not completely blocked out with the e.max restoration. Following the try-in protocol, the two crowns were tried in using clear try-in gel. At this point, with clear gel, the discoloration could be seen showing through the restoration.
Understanding how to mask this and influence the results is important in matching restorations to the oral environment. Because the discolored prep was showing through, it is necessary to mask this out to achieve a satisfactory result. The crown was tried in using try-in gel and modifications were made where needed. To dial in the desired result, an opaque modifier was added to the try-in gel colors. For this case, we opted to use the kit’s red/yellow gel because it provides more warmth and found that by adding a 10% white opaque modifier, the undesirable preparation color was masked out. While this combination did help to mask out the underlying discolored tooth upon evaluation, it was noted that some grayness was still showing through. If we were to have added a more opaque modifier to the try-in material, this would create too much of an opaque result and not be a good match to the adjacent dentition.
In this case, utilizing the try-in gel revealed that there would have been no way to achieve a satisfactory result with a specific cement color or modifier. Instead it was immediately determined that the preparation needed to be slightly altered and masked. The clinician removed a small amount from the preparation where the show-through has occurred. A thin layer of an opaque composite was placed at the preparation and cured. This step neutralized most of the discoloration.
Again red/yellow gel was used with about 10% white opaque modifier. The combination created a beautiful natural result that blended into the oral environment nicely. Once the ideal outcome is achieved, the clinician then duplicates the same formula of cement color and modifier to match the try-in gel.
The crowns, using this cement mixture, were placed over the prepared teeth and light-cured. The case resulted in a nice blend and the patient was pleased with the results.

Before and After
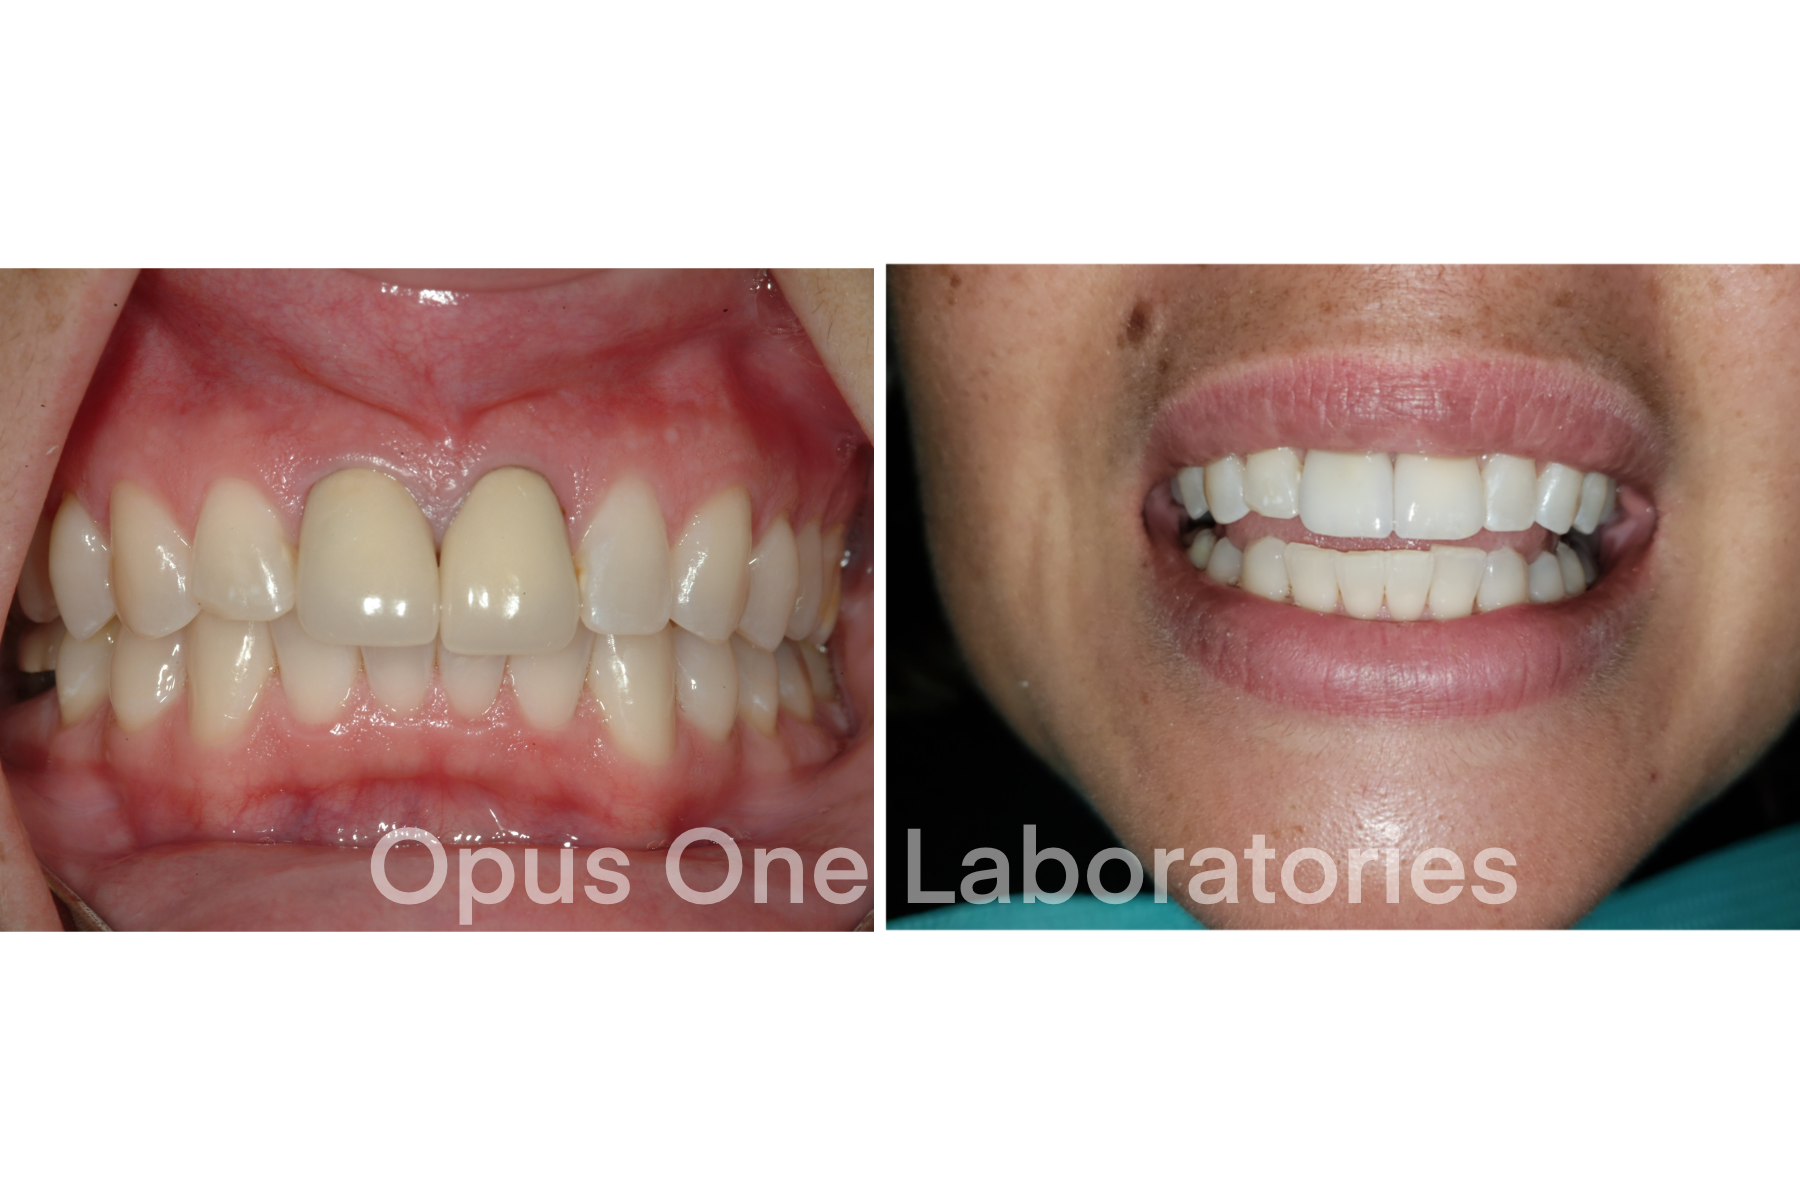
There are many factors that play a role in the success of all ceramic restorative cases. When matching ceramic cases to natural dentition it becomes even more challenging. While there are many ways to approach any given case, the factors that influence the results remain constant. Contact Opus One Laboratories today to find out more about our ceramic restorations.
Recent Opus News:

The Importance of Utilizing The Kois Facial Analyzer
In dentistry, there have always been challenges in transferring patient oral information to mount models accurately. The key to patient satisfaction is trying to minimize the need for adjustments as much as possible. Over the years, many tools have been developed to address the issues that occur regularly.

Using Time Tested Case Planning to Give Back to an American Hero
Opus One Laboratories has built its reputation on its expertise in handling large reconstruction cases and complex cosmetic cases. We have been changing people’s lives since 2000. We were honored to be asked to participate in the Smiles for America program and help give a very deserving person a new smile.

Complex Cases: A Multi-Disciplinary Approach to Successful Results
As technology in dentistry continues to advance, there are more options than ever available to utilize in treating a patient’s dental needs.